If you have only one rooster, you don't need to prepare at all for hatching--just collect the eggs from hens you wish to use as breed stock over no more than about seven days, keep them (ideally) at temps between 45 and 75 degrees, fill your incubator or put under your broody, and let the magic happen over the next 19-21 days. Or, if you have more than one roo but don't care about who is who's baby daddy, again, just gather and hatch. Ahh, for the good old days when it was that easy!
If you have multiple roos of mixed breeds, and wish to keep bloodlines
pure, it's a little more difficult. Ok, a lot. I love my entire flock
(currently: three roos and fifteen hens) being able to forage and learn
to live peacefully during the Fall and Winter, after breeding season is
done. But come an itch to hatch, I have to be sure to separate them
into breeding groups. Because chickens can, as you may have heard, FLY,
(as well as climb fences at times!) it isn't as easy as two pens.
To
be really sure, I have planned out a breeding pen, within, the regular
pen, with netting over top. This allows me to keep three groups
separate--the Black Javas, to the left, in their own pen; a breeding
group (A) in the pink area and coop, with barriers to prevent them going
into the part of the coop where group B sleeps and lays eggs, and from
the outer pen where group B will forage and run around (when not free
ranging on our property). The breeding pen gives the French Coppered
Black Marans roo, Jules, and his FCBM hens, Ameracauna hens, and Olive
Egger hens enough room to peck and scratch, but I wouldn't feel
comfortable keeping them in an enclosure that small forever (though
people do!) Covered by deer mesh netting, I'll know the hens aren't
flying out to get mated by the other roos, and that other roos aren't
flying in to mate with them.
The coop below used to just consist of an A-frame. Wehn we got/hatched more birds, we added on the high rise coop on the left. Now we turn this coop back into two coops each Spring in Summer, by stapling in chicken wire to separate the two living quarters. This lets us accomodate sequestered breeding groups, broody mamas on eggs, and a nursery area for chicks or chicks with mamas.
This shows the breeding coop's bird door. We will cut the fence at the corner of the pen shown here, and re-attach via clips (dog leash snap-clip style, most likely) to fencing at the t-psot. That will give us a cheap and easy "gate" so we can get in the pen in case of emergency, and allow us to open and close the door easily. By the way I HIGHLY recommend this type of hinged door that opens UP. Stays out of the rain if your roof overhangs a little, and keeps shavings/poo from getting in the hinge area (problem I have with another long door on this coop, on the opposite side--see below).
This shows the left side of the breeding coop, and the boundaries of the breeding pen (t-posts). Note the area under the "high rise"--provides some protection from rain. Chickens generally don't mind rain unless it is really storming, but they don't go into their coops to get out of it. They do sometimes stay in their coops for major SNOW conditions, but not rain. They prefer to hang out under an overhang of some sort during storms. This overhang also allows me to keep their food dry. I will likely lean tin or somesuch against the coop, in that area. to provide a windbreak and a little more dry room for them to gather.
This shows the egg door for my breeding group (on end of a-frame). You can see the handles from when we built this to be a mobile coop, and the area beneath the a-frame. that is fenced in for shelter. The high rise, to the right of the egg door, is the secondary addition, and expanded our original coop's capacity from about 5 birds to about 15. The egg door is important. I plan for it to be *outside* the confines of the breeding pen, which will but up against the long handle on the right, leaving the egg door accessible. That way I can quickly gather eggs without taking much of a chance on letting sequestered birds out. The long door open to the left shows the coop space for Group B, which is made up of a Roo and hens I'll be sequestering for the next hatch (soon after Group A's sequestration is ended. I want chicks to be no more than 21 days or so apart, as you can combine birds that are no more than three weeks different in age, even without a mother hen, once the youngest group is about 6-8 weeks old.)
This just shows the netting we will use to cover the breeding pen. It is extremely cheap, at about $14 for 7'x100' at Lowe's. It is flimsy, but it doesn't take much to keep a bird from flying out of a pen. We may put up two layers if it seems too flimsy.
The pen should be finished tomorrow, and I put the barrier in the coop and sequester the birds. I can start collecting eggs and be sure they are all fathered by Jules 8 days after I separate them from the rest of the flock. I can almost hear the tiny peeps of chicks nearly ready to hatch!
I can't wait any longer...it is time to get things organized for our first Spring hatch. I saw the University of Nebraska hatch cam today, and knew I had to get in gear.
My first hatch will be a "Colorful Egg Basket" mix. By having a Dark Brown-Egg (French Coppered Black Marans) Roo in the breeding pen with blue-egg (Easter Egger) and dark brown-egg (FCBM) hens, eggs will produce babies who carry genes for either dark brown or olive egg color: pure FCBMs, and Olive Eggers.
Soon to be Daddy, Jules, an FCBM roo
This weekend we'll get our materials together and build our first breeding pen, meant to temporarily keep desired love matches together (and away from opportunity-seeking roosters who are no respecter of genetics programs). This will be a secure pen attached to a coop, inside their normal extremely large pen.
It will take about one week for hens system's to "clear" previously mated Roos' genetic material and to be fertilized by the desired roo. After one week, I will begin collecting eggs, labeling them with regard to date laid, and storing them for hatching. Ideally, eggs that you are holding to hatch will be stored in an egg carton at a temperature of about 55-60 degrees. Unheated rooms or back porches are great for this. Refrigeration is NOT a good idea (though to be honest, I can point out three birds in my current flock born from eggs that were put in the fridge for a few days before I "scrambled" for a clutch to put under a suddenly broody hen). Eggs should be hatched in an incubator, or put under a broody, within 10 days maximum, though I usually try for no more than 7 when possible.
An FCBM hen--they are notable for broodiness
When I am collecting eggs in preparation for a hatch (or to ship to someone else who will be hatching them), I keep them as close to 60 degrees as possible, and I turn them a couple times each day, so that the yolk doesn't settle or get malformed. I put the eggs in a carton, and I put a brick under one end, so that the carton's left end is on the countertop and the right end is higher, atop the brick. Then I move the carton around accordingly: left to right ends on the brick, then I flip the (closed) carton over and do likewise, one move in the am, one in the pm, each day. If I start this on day 1, the carton is rightside up (with right end higher) in the am, then rightside up (with left end higher) in the pm. On day 2, I flip the carton upsidedown (a rubber band gives security here) and do the same on this day. Day 3 sees a return to position one (rightside up, with the right end higher).
I'll be hatching FCBMs (will lay eggs like the dark brown ones here)
And Olive Eggers (will lay eggs similar to the greens here)
I should be ready to set eggs on Feb 18th, which will give us a hatch date of March 9th-10th. Holler if you'd like to put dibs on some chicks from this hatch, and let me know when you'd like to take them--cost begins on day of hatch at $4 each, and goes up $1 for each two weeks that I raise them. Chicks are fully feathered and can live without a heat lamp (or warm mama) by about 8 weeks.
Interested? Comment and let me know what you want...I'll hatch based on the interest of folks here.
I am not quite ready to set and hatch eggs yet this Spring, as I like to be able to put them out asap, and they need higher temps than we are having. In the meantime, get your hatching fix here--we are glued to the screen here at the Charmed Life home:
Candling Day! Minerva had 15 eggs under her until Saturday, when I found one broken. All the eggs had to be removed from the nest and washed in hot soapy water yesterday, and when I did that I found one with cracks. (I removed it not only because I thought it would not incubate properly, but because the extensive cracking meant Minerva was likely to break it and get the rest if the eggs dirty again. Upon inspection, it was infertile). So we were down to 13 eggs and I decided today was a good day to candle them. I was particularly curious about one egg that has a tiny hole in it.
To candle, you want to make sure your eggs are at least 6 or 7 days along. It's easiest to see movement on days 7-14 in my opinion. After that the egg is mostly just a dark mass, at least with my off the shelf camping flashlights that are nothing fancy in the lumens department like some you can buy! I got my light, my chicken notebook where I keep track of stats and stuff about my two flocks, a sharp pencil, and set all that up in the bathroom, which doesn't have a window and gets VERY dark...best for candling!
I took about half the eggs from under Minerva and brought them inside. This was all the blue eggs. I candled them and found to my disappointment that only one of Ruth's four eggs was still viable--and I'm not even sure about that one. Many Easter Egger and other blue egg layers have an egg that just isn't easy to candle. I could definitely tell those that were infertile or never began to develop though--they were light colored and translucent throughout, with no really dark masses inside. You'll see chicken people refer to these as "clears" but the yolk is in there too, a light golden color that doesn't add much darkness or shadow when candling. I cracked the two clears and sure enough they still looked like the eggs I had for breakfast. I made a note that Jules, the FCBM roo, doesn't seem to be making Ruth's eggs fertile. Only one of her four looks possibly viable. I had noted that when he covers her it doesn't seem to work well. She has a crippled foot and he is a big roo...I don't think everything is coming together as it should. On the other hand, all of Esme's eggs looked viable, so it seems to be that Jules is fertile, but just isn't making a consistent love connection with Ruth. This is disappointing because Ruth lays the biggest bluest egg if any of my adult hens, and she lays a lot of them, about 6 each week, even in the worst heat. These are traits I wanted to pass on to Olive Egger line, but Esmeralda's eggs are big too and she is also a prolific layer, at 5-6 per week. Her egg just isn't as pretty a shade of blue. When my Ameracauna babies start laying in the Fall, I can work on adding more blue to the line.
After candling, I put 4 EE eggs back under Minerva. These are my only chances this Spring for a few more Olive Eggers for my line, since I lost three when I had to rehome Gypsy's babies after she was taken by the fox. This will be my third hatch this year, and I only have one OE to show for it, and she won't lay and show her egg color until September or October. Babies born from this hatch won't lay until mid-winter. Working on a new line of birds is time consuming!
After returning the OE eggs, I took out the seven Black Javas and took them inside to candle. One had an obvious blood ring...a mostly clear egg with one dark line encircling the entire inside like an equatorial line. This was a sure sign that growth had begun but subsequently ended and the chick had died.
Sure enough, a tiny embryo was inside. This shows that development ceased after just a few days. The picture shows clearly the nature of the inner air membrane too, which the hatching chick pecks into to get the first breath of air that will sustain it as it rests and then pips through the external membrane and shell.
As usual, I was very pleased with my Black Javas. Of 7 eggs, 6 were obviously alive and very active. Even the one labeled Maeve 25, with a tiny hole in it!
By the time I was done candling, Minerva's clutch was reduced to just 10. I am finding that although the broody mama has many advantages over incubating in a bator (especially since I really don't enjoy hand raising babies with their smell, mess, and fragility), the attrition rate of eggs under the broody is certainly higher than in a good bator. After all, in my last incubated hatch, 23 of 24 hatched and lived. But it seems a normal sized clutch for a mama hen is 5-10 babies...more would be pretty hard to cover, incubate, and take good care of! Since these babes will be hatching just before we begin two weeks of moving to a new home, I should probably be thankful that not all the eggs will make it to chickhood.
Our hatching is project is 2/3 of the way to fluffy baby chicks! I ended up bringing the incubator home from the classroom to candle them and because it was difficult to regulate their temperature and humidity there. Checking them at 8 am and 4 pm when we drop off and pick up our daughter in her classroom meant that any slight temp increase or humidity decrease might not be noted for 16 hours, which could be enough of an issue to cause us to hatch malformed chicks, or have a bad hatch rate, which is a nice way of saying chicks have died in their shells. I definitely don't want that to happen, even more so when the class of children will be audience to the hatch, and I won't be there constantly when the chicks are emerging. So I brought them home to ensure their optimal development, as much as possible, and also to candle them so that I can see who is developing and who may have already died or never began to develop during the incubation process.
Candling is the process by which light can be shined into a developing egg from outside, and the word comes from the old practice of using a candle to do so. Candling is an amazing experience, especially for children. Eggs are 100% boring from the outside for 21 days, until the first pip occurs and the hatching process starts--but getting a peek with candling gives a glimpse into the fascinating goings-on inside. Candling is the perfect way to get kids excited about the incubation process when their interest may be flagging! Check out this video I found on you tube...
So I candled on day 13 and found that 11 of the 12 blue eggs (some are pure Ameracaunas, some are EEs) were definitely developing--one was unclear. I couldn't really see into the dark dark brown of the French Coppered Black Marans eggs, so we will err on the side of hope and assume they are fine until we see or smell differently.
From day 1--set day--to day 18, things need to stay pretty steady. Eggs have to be turned (tilted in different ways a few times a day and stay "big end" up (an automatic turner makes this MUCH easier) and stay at a constant temp of 99.5 to 100.5. This reflects the constants that a mother hen setting would maintain with her clutch of eggs. (Broodies do get up and off the eggs for up to a half hour at a time to eat and drink and use the bathroom, and fact that means eggs have evolved to maintain their internal temps for short periods so we can do things like candle them or, in a pinch, move them from one place to another--for example, if you lose power or a bator quits on you). A good incubator mimics a broody hen much better than a cheap one, and relieves you from having to go all "mother hen" as you cluck over constantly shifting and (dreadfully!) spiking temps and humidity.
Hovabator Little Giant Incubator
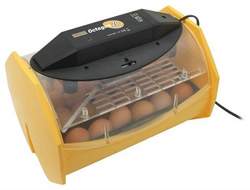
Brinsea Eco 20--I love this bator.
I started with a Hovabator LG (Little Giant), which is the bator found at every feed store I have ever been in. It's a styrofoam box and the plastic viewing window is very small, a couple inches square. This year, for the schoolyard chickens project, I bought something I've been wanting for a couple years--a Brinsea, one of the best. (Mine is the still economical Eco 20, which will hatch 24 hen eggs, and with the turner I got both for about $150). It's a plastic housing, not styrofoam, and the whole top is clear plastic, which makes viewing, especially with kids, a pleasure. This incubator has made me a very happy chicken charmer, because has maintained a great deal of stability (though 16 hours was still too long for me to feel comfortable with not being able to check it and add water or tweak temps if needed!) best advice I got? Get two thermometers, the best you can afford--glass with mercury is great--and check them against your home thermostat, which is usually pretty right on. take note if they read lower or higher than your thermostat and each other, and mentally 'calibrate' them each time you take a reading. It's not as hard to remember as you might think, especially if you have one that is pretty spot on. One word of caution: the plastic strip thermometers that come with incubators are often 5 degrees or more off--be careful!
Aquarium I put eggs into at lockdown for better viewing
You can see my setup from my last hatch to the left. I was desperate for the kids to be able to see the whole hatch, so I retrofitted a 10-gallon aquarium and put the eggs in it from my Hovabator on day 18, as a hatcher. I had trouble regulating the temp and humdity with such a large expanse of glass. You can see I have a large container of water to help keep humidity at 75% and was still having trouble (surface area is the most important factor--shallow and wide is better than narrow and deep)/ Iused a sponge and an old clean dishcloth in the water to help. It was an ok hatch rate--6 of 11 fertile eggs hatched. My biggest gaffe with this was that it was November and I didn't realize the window in the kitchen was slightly open, and I forgot to wrap aluminum foil around it that night--those things together meant the heat lamp on top couldn't keep the temp high enough to sustain the hatch. I woke to find the hatcher at 92 on the morning after six of the twelve birds had hatched.
Egg on far left has pipped
About humidity...you'll find two schools of thought on what humidity should be. Some folks recommend wet hatch--meaning 50-60% humidity until day 18--while others swear that will end with "drowning" chicks during the hatch. "Dry hatch" means keeping humidity at or below 40% until lockdown, and only adding water to the bator when it goes below about 25%. You'll find equally expert old-timers who are ADAMANT that their way is the way to go, because they've had hundreds of thousands of successful hatches that method. Yet they've used opposite methods to reach their success. After a ton of research into this puzzling phenomenon, I realized that the link between humidity and hatch rate is affected by a third variable--altitude. Folks in Colorado and Northern California and Montana have the greatest success with wet hatch, while people where I live--in Arkansas, near the Missouri and Kansas and Oklahoma borders--at much lower altitudes, do better while using lower humidity levels during incubation. What's right for you? Talk to people who have successful hatches in your region, and do what they do--then tweak your results, which may vary from theirs due to your bator or your eggs. I like to keep my eggs between 30% and 40% humidity until day 18, and I only add water when we get down to 25%. How does one gauge humidity? You need a hydrometer. They sell them at Lowe's and Wal-mart with the thermometers. Another word of caution--they are often off. To tell by how much, there is a relatively easy hack. Put 1/4 cup salt into 1/2 cup hot water and stir. Place cup and hydrometer in sealed plastic bag or food container--lid must be airtight, and make sure the hydrometer isn't going to get wet. After 8 hours, the gauge SHOULD read 75%. If you are reading high or low, take note by how much--you know exactly how much to add or subtract each time you check it; almost as good as having a perfectly calibrated instrument.
Zipping!
Day 18 is lockdown day. That's the day you turn off the automatic turner (or stop hand-turning the eggs) and bump humidity up to about 70-75%. You do this by adding water to the reservoirs in the bator. Putting a cloth or strip of thick cardboard in the reservoir will retain more moisture in the air for longer. 75% is ideal. Eggs may begin to peep and/or rock anytime after that, and eventually the chick will peck through the inner air sac and make a small hole in the shell through which it will get its oxygen and rest for a while before attacking the shell in earnest, creating a "zip" around the egg at the boundary of the air sac until the top of the shell pops completely off and the chick makes its way out. (In the video below, you can see where I have penciled in the "zipline" the chick will crack open. I knew where to draw it by candling and seeing the delineation of the air sac. I did this when I took the eggs out of the turner for lockdown).
Look, don't touch, during hatching.
It's extremely, ridiculously important--the difficult to overstate kind of important--that you follow a few rules about lockdown. One: sit on your hands. Two: sit on your hands. Three: You get the picture! Humidity levels drop rapidly when you open the lid to mess with the eggs or add water. If a chick has pipped the tiny air hole in its egg and you don't notice it (very common when you have more than a few eggs hatching!) the humidity dropping can "shrink wrap" the baby, making the inner membrane stick to its body all over inside the egg, and making hatching extremely difficult without the help of a human. And once a chick is in trouble due to shrink wrapping and you open the bator to help it, you've just increased the chances of another one or more chicks getting shrink wrapped too. It is much, much better for everyone involved to let hatching happen naturally, without opening the lid. Most birds that have to be helped out of their egg will have problems and you may end up having to euthanize them. A crippled or malformed chick is better left inside the shell if it cannot make it out alone, in my opinion. Children can accept that "that chick just didn't make it" when "that chick" is nothing more than a shell with a small hole in it. Help it out and you have a cute but ailing, or a grotesque issue to deal with. Not fun with kids. Again, my mistakes can be avoided! If you MUST open the bator for some reason during lockdown, do this. Go into the smallest bathroom you have, and crank up the hot shower. When the room is filled with steam, that's the least problematic time to open the lid. You want the humidity to not drop below 75% when you do this--higher is ok.
Hatching. This is the exciting part! (As you watch this video, please ignore my children fighting and or screaming, or me being ever so slightly crabby/frustrated about said fussing. I don't know HOW other people manage to post videos without these "bonus" effects.) It can be hard not to swoop in and get the new babies out of the wet, sometimes stinky bator at this point, but resist the urge--any opening during hatch (after the first chick has pipped) endangers them. Baby chicks come equipped with the ability to stay in the hatcher for a couple days if needed while the others make their way out. They absorb the last of the yolk sac at the end of the hatch process, and it gives them the nutrients needed. This is how big hatcheries can ship boxes of live baby chicks--they are sent on the first day of life. So try to leave them in the bator/hatcher as long as possible. The little guy you saw hatching in the video can be seen here resting an hour or two later. Soon the incubator was overtaken with the hatching noises and excitement of three chicks hatching at once, so his nap was especially cute. Within a day or two after the first egg hatches, all the birds will be out and will have puffed up super fluffy and cute.